Shake&Tune je plugin pro Klipper z ekosystému Klippain, navržený k vytváření přehledných vizualizací, které vám pomohou řešit mechanické problémy a poskytnou nástroje pro lepší kalibraci filtrů INPUT SHAPERU na vaší 3D tiskárně. Lze jej nainstalovat na jakoukoliv tiskárnu s Klipperem a není omezen pouze na zařízení využívající kompletní Klippain.
UPOZORNĚNÍ
Při ladění 3D tisků a vylepšování tiskárny je tu celé to téma okolo testování rezonance, se kterým se vám Shake&Tune pokusí pomoci. Mějte však na paměti, že je to jen část celkového procesu, a samotný Shake&Tune nezajistí, že vaše tiskárna bude tisknout perfektně a závratnou rychlostí. Při používání těchto nástrojů je také důležité nezapomenout na hlavní cíl: KVALITNÍ TISK
Instalace
- Ujistěte se, že máte na vaší 3D tiskárně funkční akcelerometr a definovanou sekci [resonance_tester]. Při jeho konfiguraci můžete postupovat podle oficiální dokumentace nástroje Measuring Resonances Klipper.
- Instalace se provádí jednoduše pouhým spuštěním instalačního scriptu přes příkaz který zadáte přes SSH (např. přes Putty) po připojení k vaší tiskárně.
wget -O - https://raw.githubusercontent.com/Frix-x/klippain-shaketune/main/install.sh | bashKonfigurace
Po úspěšné instalaci přejděte do souboru printer.conf ve vaší 3D tiskárně a přidejte následující definovanou sekci a po uložení proveďte restart Klipperu:
[shaketune]
# result_folder: ~/printer_data/config/ShakeTune_results
#    Path where the processed results will be stored. If the folder doesn't exist,
#    it will be automatically created. You can change this if you'd like to store
#    results in a different location.
# number_of_results_to_keep: 10
#    This setting defines how many results you want to keep in the result folder.
#    Once the specified number is exceeded, older results will be automatically deleted
#    to free up space on the SD card and avoid cluttering the results folder.
# keep_raw_data: False
#    If set to True, Shake&Tune will store both the processed graphs and the raw accelerometer
#    .stdata files in the results folder. This can be useful for debugging or archiving purposes.
#    Please always attach them when reporting any issues on GitHub or Discord.
# show_macros_in_webui: True
#    Mainsail and Fluidd doesn't create buttons for system commands (macros that are not part
#    of the printer.cfg file). This option allow Shake&Tune to inject them into the webui at runtime.
#    If set to False, the macros will be hidden but still accessible from the console by typing
#    their names manually, which can be useful if you prefer to encapsulate them into your own macros.
# timeout: 600
#    This defines the maximum processing time (in seconds) to allows to Shake&Tune for generating
#    graphs from a .stdata file. 10 minutes should be more than enough in most cases, but if you have
#    slower hardware (e.g., older SD cards or low-performance devices), increase it to prevent timeouts.
# measurements_chunk_size: 2
#    Each Shake&Tune command uses the accelerometer to take multiple measurements. By default,
#    Shake&Tune will write a chunk of data to disk every two measurements, and at the end of the
#    command will merge these chunks into the final .stdata file for processing. "2" is a very
#    conservative setting to avoid Klipper Timer Too Close errors on lower end devices with little
#    RAM, and should work for everyone. However, if you are using a powerful computer, you may
#    wish to increase this value to keep more measurements in memory (e.g., 15-20) before writing
#    the chunk and avoid stressing the filesystem too much.
# max_freq: 200
#    This setting defines the maximum frequency at which the calculation of the power spectral density
#    is cutoff. The default value should be fine for most machines and accelerometer combinations and
#    avoid touching it unless you know what you're doing.
# dpi: 300
#    Controls the resolution of the generated graphs. The default value of 300 dpi was optimized
#    and strikes a balance between performance and readability, ensuring that graphs are clear
#    without using too much RAM to generate them. Usually, you shouldn't need to change this value.
Nezapomeňte si prohlédnout dokumentaci Shake&Tune zde.
Generování grafů pomocí jednoduchých příkazů
| Shake&Tune příkazy | Příklad výsledných grafů |
|---|---|
AXES_MAP_CALIBRATIONOvěřte, zda váš akcelerometr správně funguje, a automaticky zjistěte jeho parametr axes_map v Klipperu | 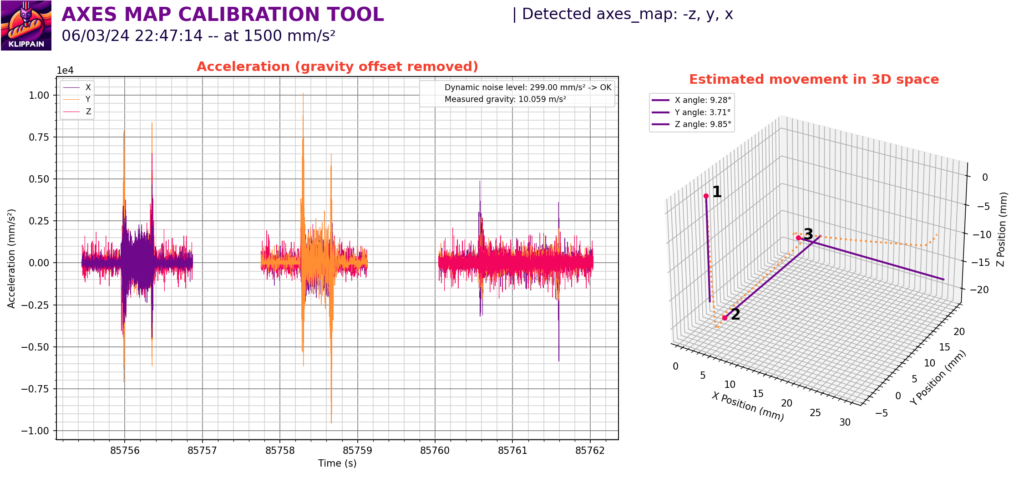 |
COMPARE_BELTS_RESPONSESVygenerujte graf diferenciální rezonance řemenů pro ověření relativního napnutí řemenů a chování dráhy řemenů na tiskárně CoreXY nebo CoreXZ | 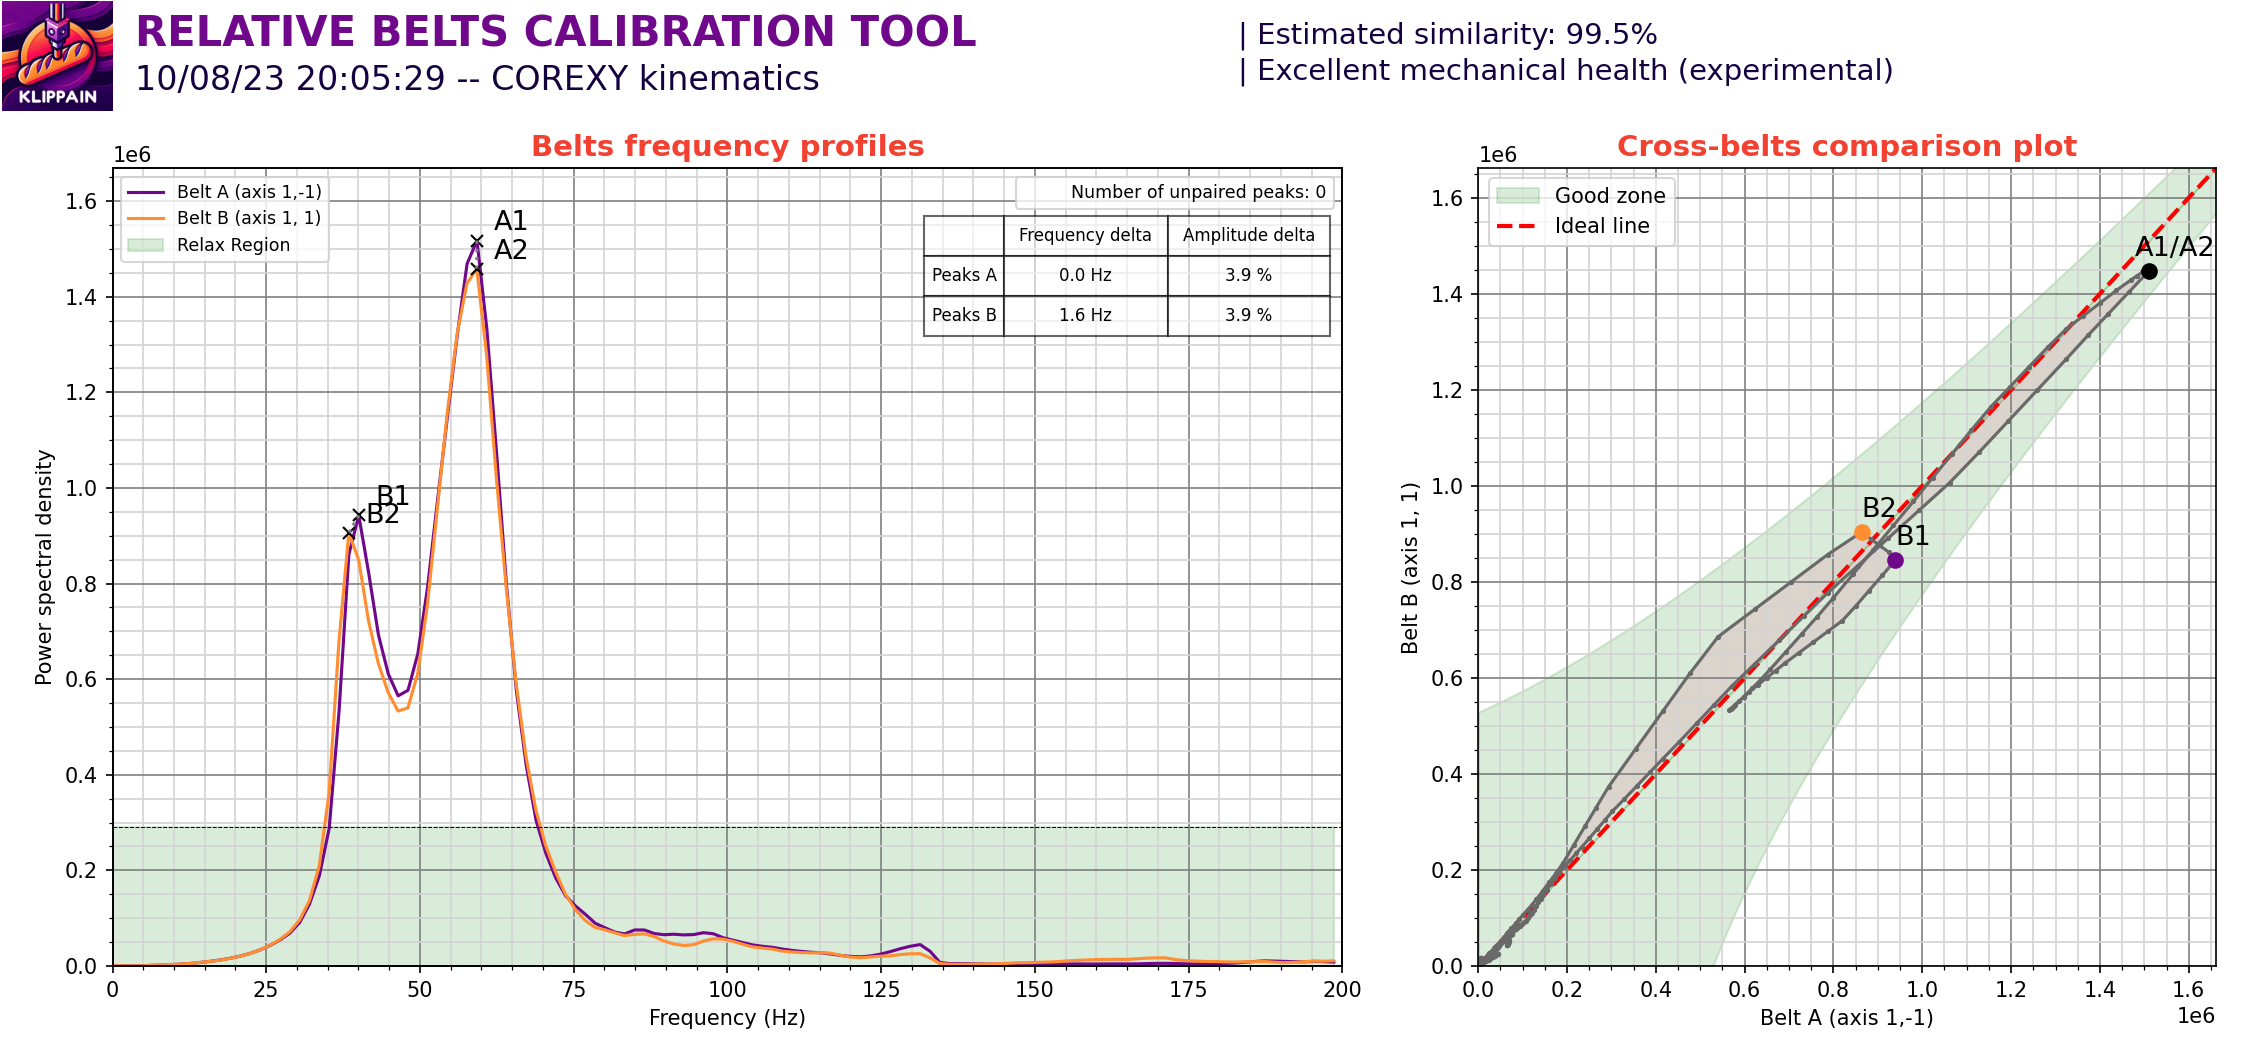 |
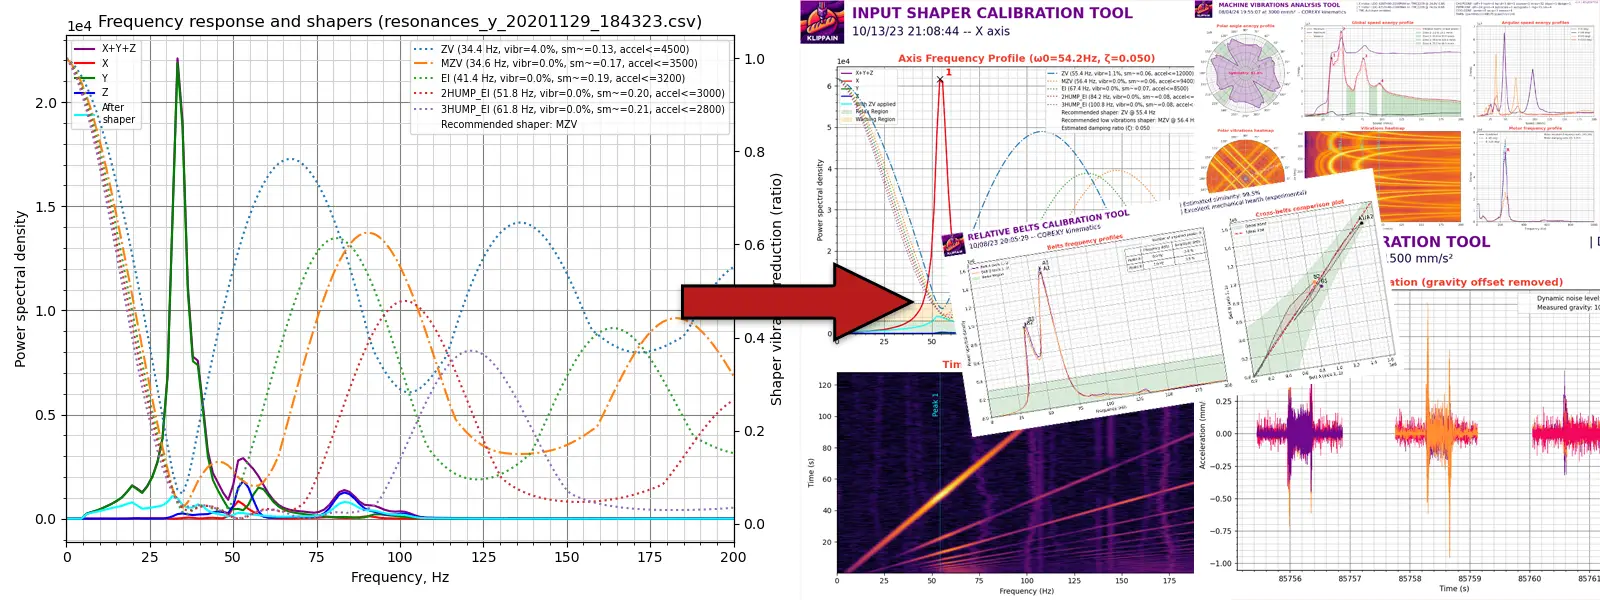
AXES_SHAPER_CALIBRATIONVygenerování grafu vstupního tvarovače pro ladění filtrů vstupního tvarovače v Klipperu pro snížení rezonancí/duchů | 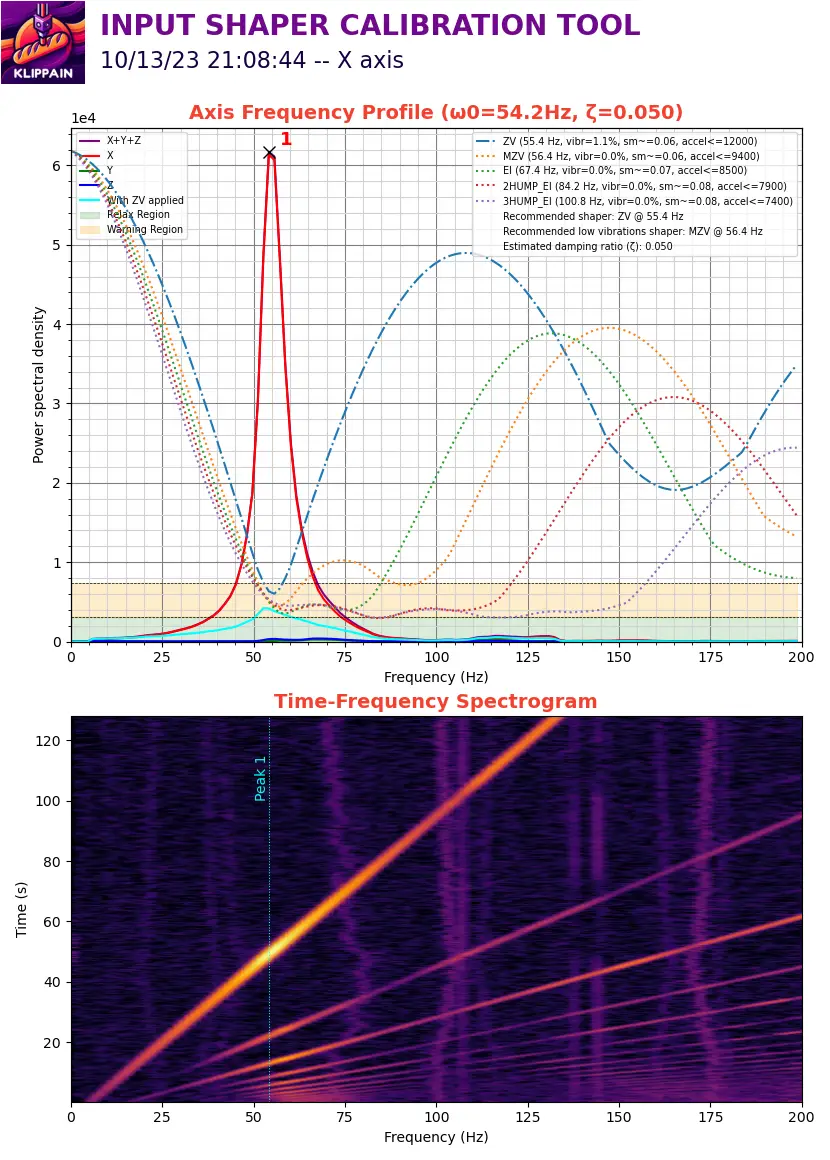 |
CREATE_VIBRATIONS_PROFILEZměřte globální vibrace vaší tiskárny v závislosti na směru a rychlosti pohybu tiskové hlavy, abyste našli problematické rozsahy, ve kterých může být tiskárna vystavena větším VFAs (vibračním frekvenčním artefaktům). To vám pomůže optimalizovat rychlostní profily sliceru a parametry TMC driverů | 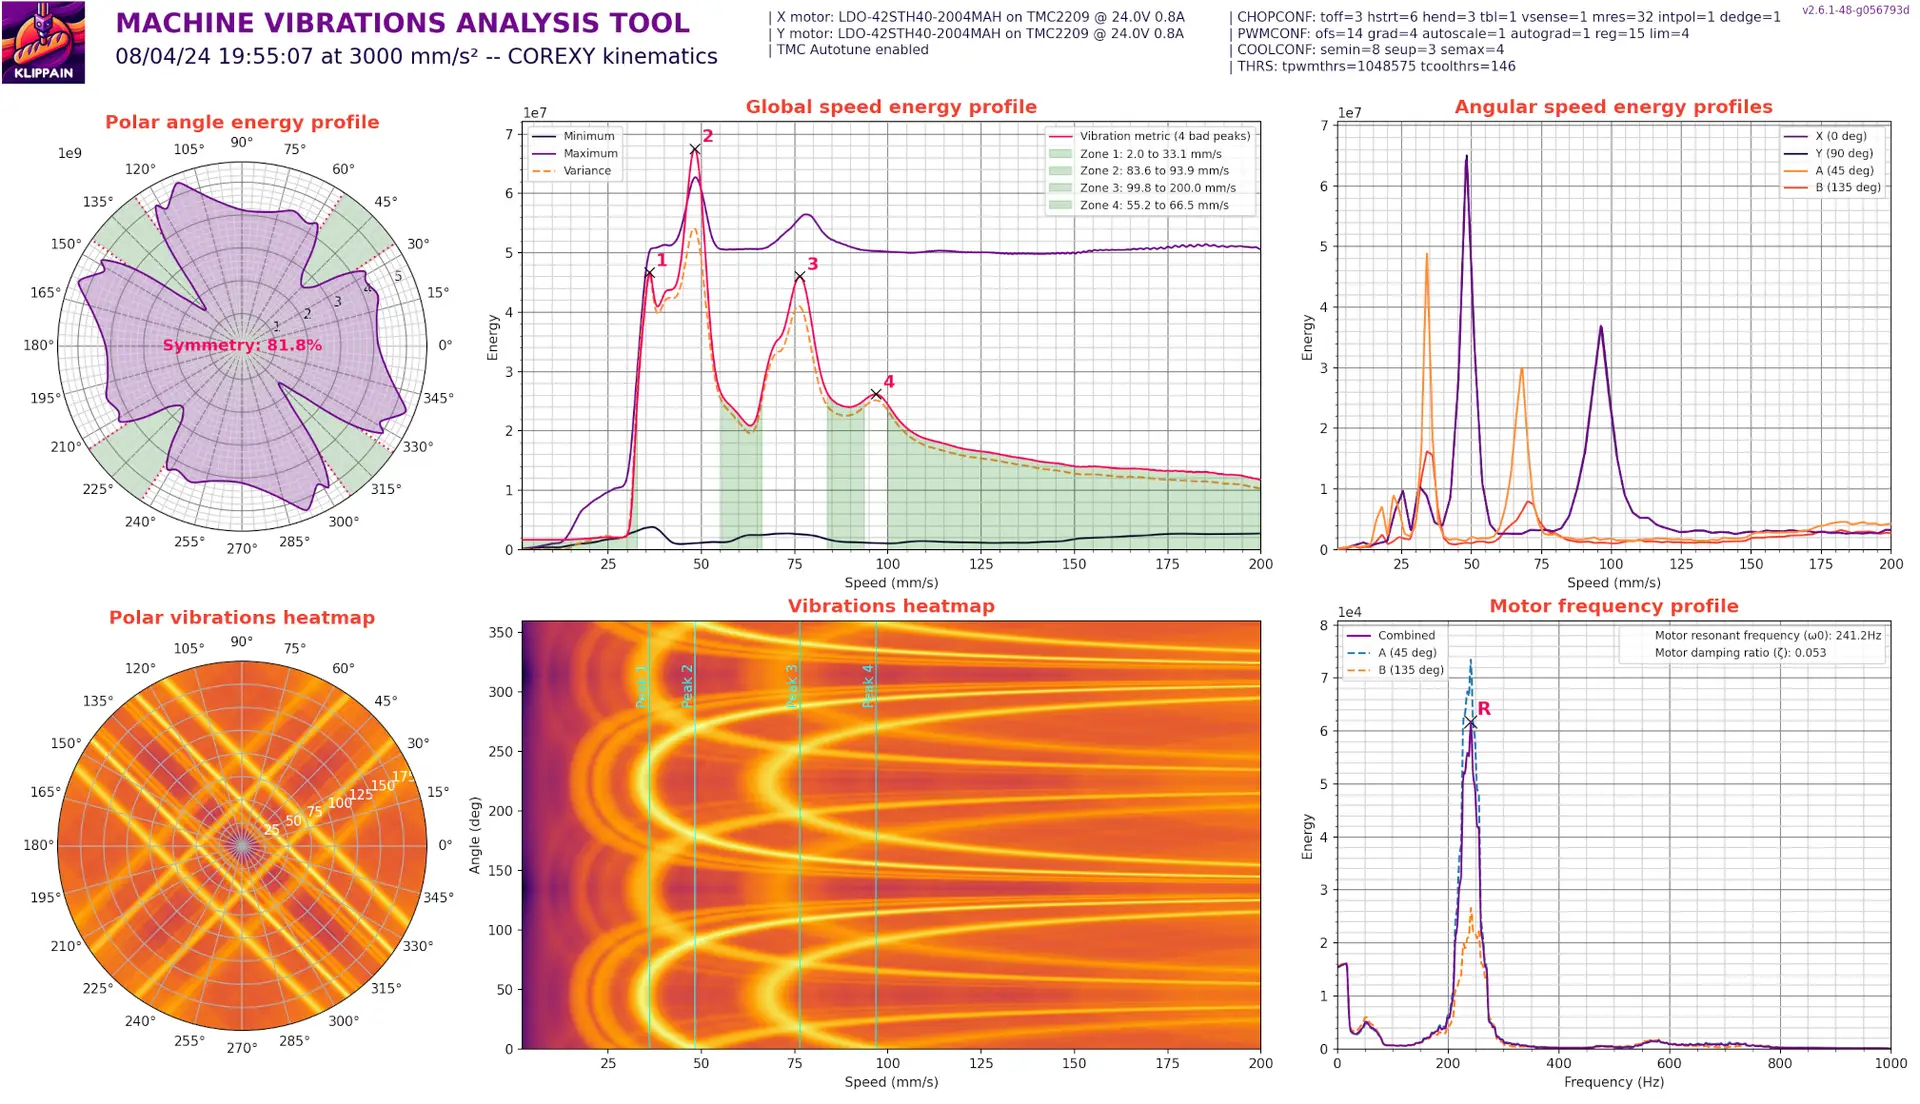 |
EXCITATE_AXIS_AT_FREQVyvoláte specifickou excitační frekvenci, což je užitečné pro kontrolu parazitních špiček a zjištění, co způsobuje rezonance | 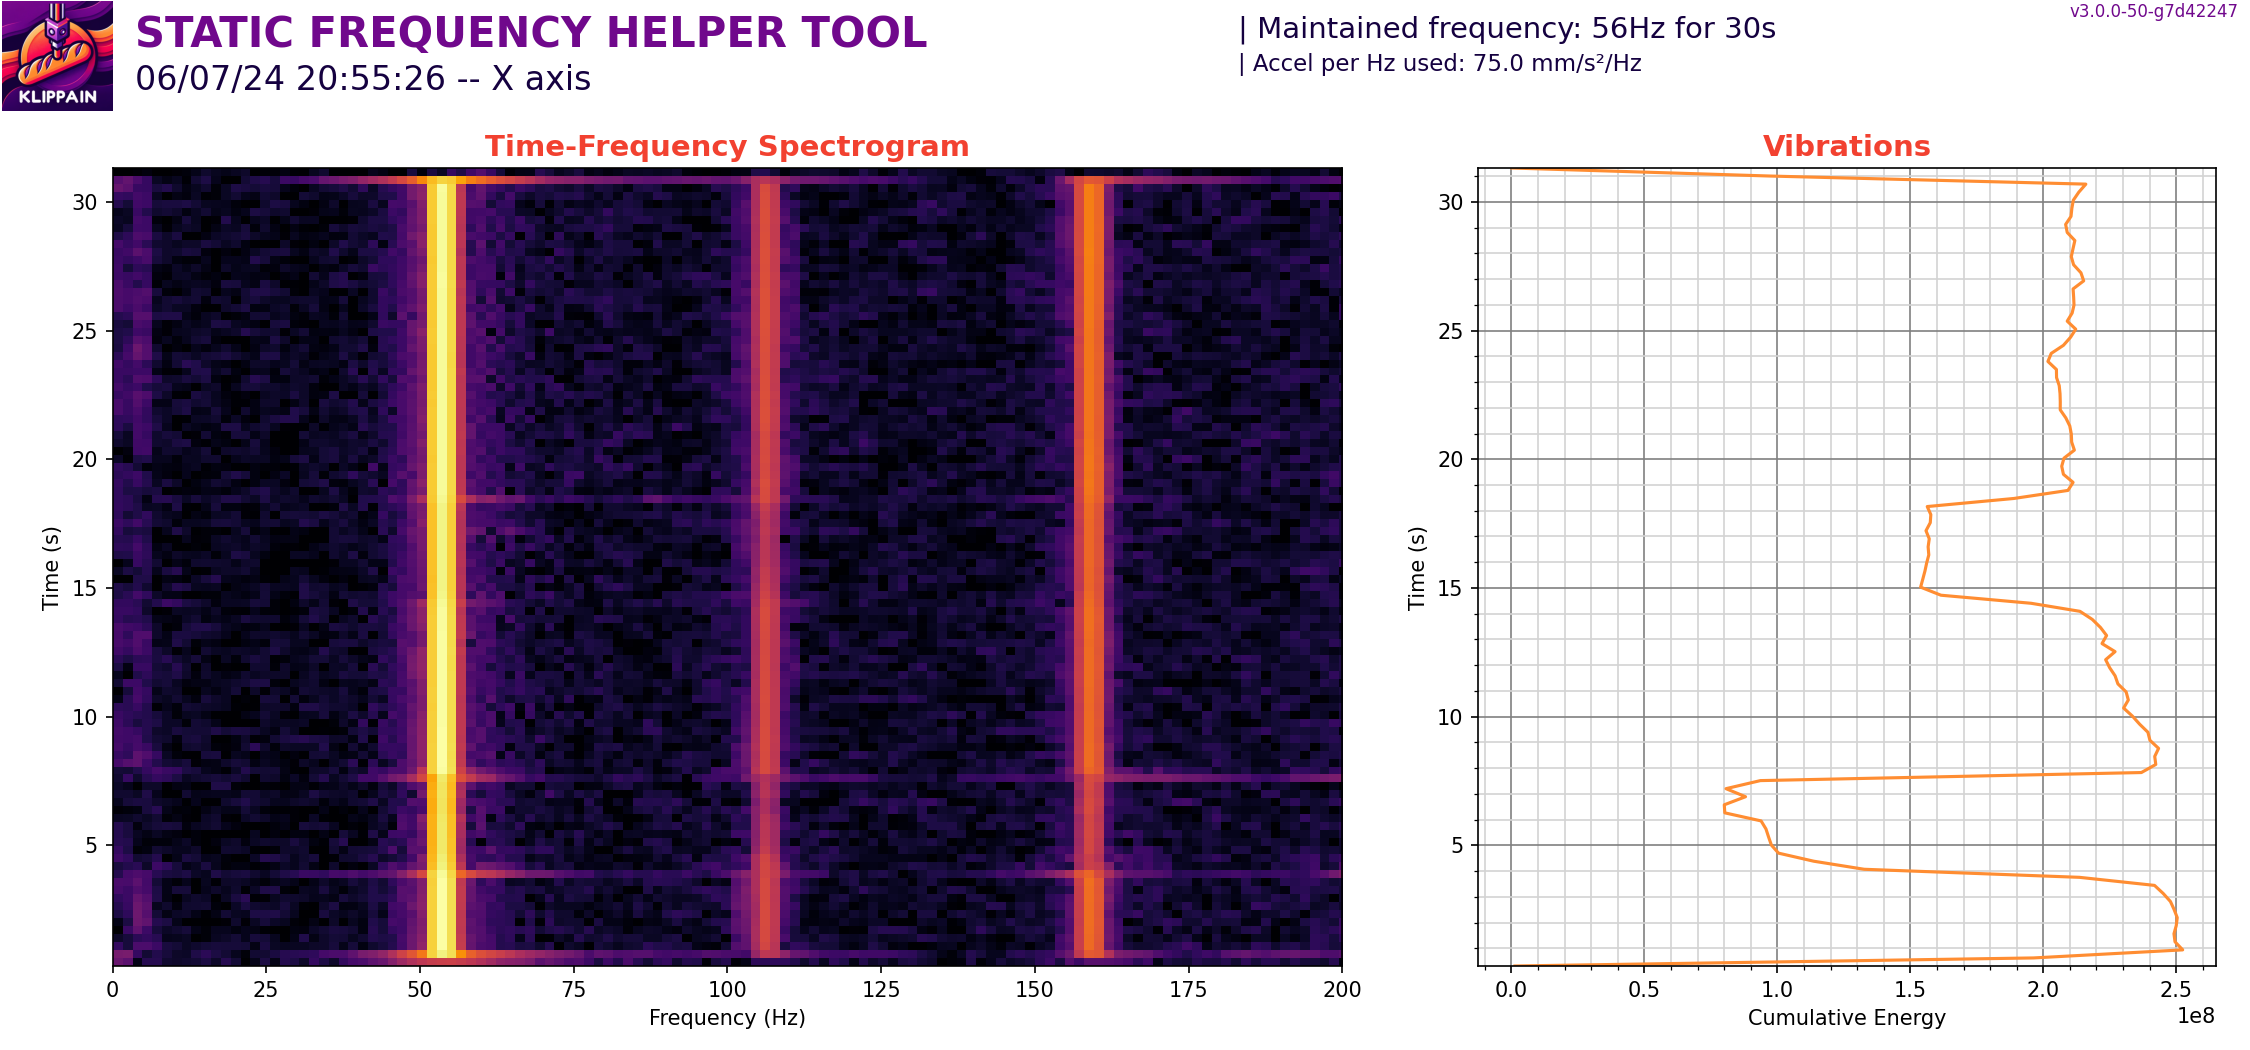 |